The rules of reality say the Bumble Bee shouldn't be able to fly...some rules were meant to be broken.

Sunday, December 26, 2010

The Gifts Have Been Given...Time To Share Them Now.

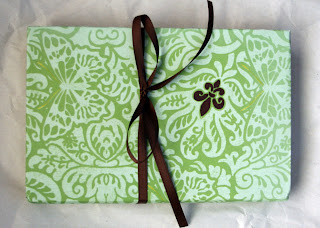
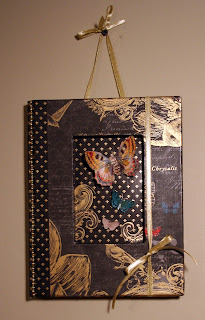
The Christmas gifts have been given, therefore, they can now safely be shared here.  I made altered book photo frames for my sisters, sisters-in-law and my mother.  All I need to do now is find a place to host a how-to class for this art.

These books can be opened and the photograph can be changed in the hard plastic sleeve inside.  I haven't seen this done before, the idea just popped into my noggin one day.


Donna's Book


Mom's Book


Liz's Book


Kathy's Book

Nici's Book


All these books were decorated with various thrift store finds.  Two have Prima flowers.  I love making them just to see what idea pops up next. 

This really did bring out the joy of giving for me this year.  They were greatly appreciated, admired and shared.

Merry Christmas & Happy New Year to you all.

Wednesday, December 22, 2010

What Christmas Means

What Christmas Means
by
Theresa Higby

Tidings of Great Joy by Theresa Higby

Christmas means a Father's promise has been fulfilled.

Christmas means when you have absolutely nowhere else to go, God can relate.

Christmas means the humblest King came to be a servant to all.

Christmas means both the lowliest Shepherd and the noblest Ruler
 can share equally in the greatest gift ever given.

Christmas means religion has died and a relationship has been born.

Christmas means there is nothing that you have to do, it's all been done for you.


Merry Christmas to all. 
 May you truly find the joy of this blessed season.

Friday, December 17, 2010

A Crafty Break...

My crafting, and remodeling efforts, are taking a break today so that I can work on a Christmas Present that a friend of mine requested for his wife.  This pretty girl was her pet for many years and my friend asked for the portrait after he saw a painting I did of his father's dog.

I've been painting and drawing all my life and I love being able to share this gift with people knowing that they will be able to find joy in owning a piece of my work.

So, Merry Christmas.  May you find the true joy in giving this year.  Give of what ever gifts you possess.  It's the most blessed joy you can receive during the holiday season.

Post Script 12/21/10  She is done.  What a cute girl!

Post Script Post Script 12/22/10  I was told that the giftee is going to cry.  I never thought the thought of someone crying would make me happy...but I think you know what I mean.

Tuesday, December 14, 2010

Go Toward The Light...

Turning something kind of tacky into something lovely to look at can be done in all sorts of interesting ways.  Take these lamps.  I found them a few years ago at a consignment store and I fell in love with the glass base.  The cut of the glass and the night light inside made me want to leave them on all the time.  But the ugly, dirty nylon shade left a lot to be desired.

I have no idea where this idea came from, but I really wanted to create something that used the light of the lamp as part of the decor.  Somewhere in the cortex under my hair the idea of a "slide" popped up.  How or what that would result in took a day of idea shopping and thinking.  More on this later...


After bringing in one of the usual suspects, thrift store fabric, I splurged a little bit on this project and spent about $15 on two different coordinating fabrics that match my bedding.  I didn't use this fabric on the lamp but it did help me create that unique light effect.  I also picked up some trim and some ribbon for an additional 8 bucks or so.


The first step was to grab a pair of scissor and remove the cheap nylon strips from the frame of the lamp shade.  Eye sore gone, yeah!  I ripped my cheap cotton fabric in strips and frayed the edges.  Yes, I do like to do this a lot.  It's because I am too lazy to sew things.  I stitched the strips together by hand with the seams facing out and frayed those edges as well.  After wrapping the fabric all around the shade frame I stitched the end onto the rest, again by hand, and frayed the edge.

Here is a tip.  Be sure to count the number of wraps between each support bar on the top so that the strips of fabric are evenly spaced all around. Count the number of times you wrap the fabric around the first frame and duplicate that count around the second. 

Now for the light effect.  I scanned the fabric I bought into my computer and created images of the moth's, butterflies and bees on the fabric and printed 6 color images on a piece of paper.  Since I live close to everything (one of the better features about living in this neighborhood) I made a quick jaunt over to Kinkos and printed 1 copy on transparency film.  Another jaunt over to Mystic Paper and I cut 12 small frames out of Idea-ology Grunge Board.  I made six slides gluing the transparencies between the grunge board with the top piece wrapped in the coordinating fabric.   With a grommet punched into either end of the slide I ran ribbon through and tied 3 slides around each shade.  When the light is on it creates a pretty soft picture on the shade.


Finally, I stitched a coordinating trim to the bottom of each shade and topped them off with a cheap $3 antique finish finial from Home Depot.


Originally my plan was to refinish the brass base as well.  I'm so happy with how pretty these turned out I've decided that it gives it a little bit of pizzaz and have left it alone.   It's very romantic.  Oooo, la la.

Mucho, mucho better.  Most of the time I do leave these lamps on now.  I just love walking into the soft light warming my bedroom.


Sunday, December 12, 2010

Captured Beauty

I am blessed to have several friends who are very talented photographers.  John Tarr (click here) not only has a talented eye but nature seems to follow him wherever he goes.

Out-witting physics

 When I saw this one I knew it was the perfect piece of John's art to share here on my blog.  Be sure to follow John.  He is a wonderful teacher and shares a lot of his know-how on the blog.

Friday, December 10, 2010

Today's Thrift Store Re-purpose

Sometimes you run across a piece that you know is just perfect.  Even if you don't know what it is or where you will use it you just know that it's perfect.


An online search for "Maison de Provence" found several links referring to a shop with this name in New Orleans that specializes in French and Antique furnishings.   I think it is a tray for a planter but I was unable to find anything similar on their website.  Regardless, this $2.99 find at Goodwill was the perfect large piece for my kitchen shelf (a former kitchen cabinet).  It was a little grungy when I purchased it so I cleaned up the gooey stuff and was left with just enough distressing to make it simply beautiful.  P.S.  The solid marble candelabra next to it...also a Goodwill find.

These pieces will "pop" quite a bit when I have finished the inside of the shelf with fabric.  


I am becoming a Goodwill addict.  I must learn to control myself.

Wednesday, December 8, 2010

I Forgot To Mention...

So sorry to forget this.  Particularly since I expect it to be one of the most unique and endearing features of my new kitchen.  I completed the first part of my test on my faux wood beams.  You can find faux wood beams on the internet but the price is, well, let's just say....CRAZY!


As is my calling, I have found a more affordable way to create this look.   I'm using different tools and chemicals to make these but here is the basic shape.  You can buy this styrofoam in 4' x 8' sheets from Home Depot.  It comes in a variety of thicknesses.  I picked the 2" thick foam and glued two pieces together with spray glue.  (Spray both pieces of foam).

I cut the pieces 5" wide and glued them together to form a 4" x 5" beam.  Since I was working outside I reached over and grabbed my Bar B Que scrubber and used it to scrape the foam on the sides and hide the seam.  I scraped it across the wide side of the foam to create a wood grain effect..

Since I have worked with this kind of foam before I know that Mineral Spirits will "eat" it.  Next step...using Mineral Spirits to create the look of aged insect tunnels.  Be sure to check in as I go along to find out how they look.

Monday, December 6, 2010

Kitchen Project - Something A Little Different

These homes built in the 1950's have a wonderful, energy saving feature (NOT!) that you just don't find in new homes.   Nothing says mid-century Ranch in Arizona like crank-out windows.  Windows that crank out require one very important thing, screens that hang "in".  That doesn't necessarily mean Ugly.  Idea time once more.

I painted the metal screen finish white.  A nice dress up, I thought.  But, ooo-ooo-ooohhhh noooo.  That would be way too easy.  A black & white Country French theme is what I'm going for here.  So I printed a Fleur De Lis on card stock and made my own stencil.  A quick spray of black paint and...voile!  (Note the extra touch with the Christmas Ornament for the holiday season)

Don't forget the finishing touches.  They can add a lot of spark.


Bryndal!  Don't chew the screwdriver!


Sunday, December 5, 2010

Creative Kitchen Cabinets

Update #1 on the Uber kitchen remodel.  Kitchen cabinets.

Testing various techniques - Tying in to the existing back splash and future counter tops.
 
I used a door from our old linen closet to create a test board for the techniques I was thinking of using for the kitchen cabinet make-over.  It was still laying around from our Master Suite remodel, and since it is the same type of wood I thought it would be a good work surface.  What I needed to accomplish was to achieve a technique that would maintain the visual integrity of the fabric print but allow me to distress it at the same time.

Fabric Distressing Technique
  
And the winner is...

 
I protected the fabric and created texture by covering it in two layers of clear, water-based kitchen caulk.  It's white coming out of the tube which allows you to ensure adequate coverage of your area, and dries clear.  Don't use the type that must be cleaned with mineral spirits.  It's too shiny and sticky, even after it has dried.  The first layer of caulk was spread on thinly with a drywall blade.  The second was slapped on thickly, and rather hap-hazardly to create depth and added a nice touch with the application of the antique glaze. 

I tried a few other ideas that I thought would create the antiqued look I was going for, but none of those protected the fabric.  Once the glaze was applied it just soaked right in and covered the pretty toile print.


In addition, I needed to test my use of old faux wood window blinds as the frame for the doors of the cabinets.  With these blinds you get nice convenient little holes about every 10" which allow the strings to work the blind when it's hanging in a window, but inconveniently create a quandary when you are trying to re-purpose them.   Problem solved.  I covered each hole by applying Spackling Paste to a fleur de lis stencil.  Once the paste was dry I dampened my fingers with a tiny bit of water to rub out any sharp edges and they look very attractive with the glaze applied.


I'll be completing the top doors in the kitchen first.  I think I may simply apply the same technique on all of the lower cabinets without the fabric, to lend a little bit of subtlety to the overall look.

Keep checking in.  This could get very interesting.


Yes, Bryndal, you can chew on my coke bottle.  I'm finished with it.

Saturday, December 4, 2010

A Dollar Store Dress Up

The creative bug has taken serious hold of me.  That bumble bee has stung me too many times.

As I was going through a few old things while I was cleaning my office I started a thrift store donation box.  I tossed in a shoe I think my dog ate the mate to, some electronics cables that aren't compatible with any equipment that we have, (What exactly is a VCR, anyway?), an old cheap resin parakeet from the 99 cent store, then a...  Wait a minute.  I can do something with that ugly parakeet.

 I mean, really.  They don't come any cheaper than this, do they?  Tacky, tacky, tacky.

But my brain said "NO".  It does not have to stay tacky.  I can rebuild it, I have the technology!   By technology I really only mean the chemicals that make up a can of glazing medium, gesso, and acrylic paint.

So I took this pathetic little guy and covered him in two coats of artists Gesso.  Two more coats of white acrylic paint, and all of the color was thoroughly concealed.  With a whopping large mixture of a spoonful of glazing medium and a spoon of tan paint, I covered him with glaze doing small sections at a time.  I gently sponged most of the color off with a damp cloth.  Two light coats of a matte finish clear coat spray completed the job.


He is, as they say, a new man.  I am no longer ashamed to display this stunning "sculpture" in the public spaces of my home.  I believe he will fit in nicely with a more classic Country French decor.

Remember the old saying..."Don't judge a cheap resin figurine from china by the store you bought it in."   Ok, maybe that's not really how the saying goes but who says we all can't create our own new sayings.  I think this will be my tag line for a while.

Some times a little bit of vision can transform what is before you into a pretty addition to your surroundings.  Try looking at what you see without the color and then picture what you might be able to do with it. 


Bryndal....oh, never mind.

Wednesday, December 1, 2010

The Giganto, Humongous, Mondo, Uber Project Begins

My husband wants a new kitchen.  No! Seriously!  He hates our kitchen and he wants a new one.  Every day he has to walk through the kitchen to get to his precious Man-Cave so he is constantly reminded of how much he hates the kitchen.

1954 was a lovely year for kitchens
 But remodeling would be super costly, and we are too cheap.

So here is the goal...remodel my 1954 kitchen for as low a cost as possible, re-using as many of the current items as possible, while achieving a fine French Country finish deserving of a few "oooo's" and "ahhhhh's".

The cabinets are sight built and structurally bound to the universe.  They don't build them like that anymore.  They'll be staying put and receiving a fine treatment with fabric, recycled window blinds, paint, caulk and drywall mud.

The appliances all work just fine.  Olivia is the original 1954 gas cook top.  She works like a dream.  I'd like to find a way to re-finish her with a heat resistant enamel paint.  Carol (lovingly named after Carol Brady), the 23" gas wall over works just as well.  Even the built in timer functions flawlessy.

Dated but fully functional appliances


Ok, ok, ok.  So I have to throw in this story here.  This is the first house we have had with gas appliances.  Right after we moved in my husband, Dave was yelling from the kitchen that the oven wasn't working.  When I went into the kitchen to investigate he was repeatedly pushing a button above the oven door.  "It worked fine the last time I used it.  What did you do to it?"

"Nothing" he replied.  "But the 'light' button isn't working."

"The what button" I asked curiously?

"The 'light' button" he responded as he pressed his Schwarzenegger finger on the tiny little chrome knob over and over again.  I burst out laughing and he looked up at me with crooked, sheepish grin on his face, those blue eyes twinkling with confusion.

"Honey, dear", I mused.  "That's the button to turn the light on so you can see what's cooking.  You turn the oven on by turning the temperature dial."  I slipped my hand up the knob and turned it to 400 for pizza.

After a brief pause he huffed with embarrassment and said quietly, "Oh.  I thought it was like the stove and it had an ignition."

I love that guy.  Back to the project...

I took the door off of the horizontal cabinet above the sink.  No one but Dave can reach it anyway, so I will add a treatment to this "plant shelf" to tie it in with the cabinets.  I will also be shopping for a set of matching vintage light fixture to replace the ultra cheapo hardware store versions currently in place.

A plant shelf and new light fixtures are in the plans
 And last, but of course not least...the counter tops.  Those lovely Formica counter tops;  those UGLY Formica counter tops with their burn marks, scratches and permanent mold caulking around the sink.  I can't replace them without ruining the back splash, and that I actually like.  We will be tiling over the existing counter with new ceramic tile in black.  The current back splash is in perfect condition and has a sweeee-eet black accent that will tie the whole thing together.  You can see it better in the appliance picture.

Can you say "Yuk!"
I think this project will take several months, lots of man, um no wait-woman hours, and some minor expenses.  The project will be blogged as I proceed with the costs incurred and the techniques.  I will summarize all of the expenses and hours when I am finally able to post the photos of my completed Country French kitchen.

After that...  A vacation.  I don't think I'll be done before our pre-Army ship-out Disneyland trip with my son in March.  Hopefully when we return from his Basic Training graduation in May we will be coming home to our "magnifique cuisine".

Stay tuned...ask questions...make comments if you wish, and don't be surprised if an emergency room tale, or complaints about how old I am surface occasionally.


Where is Bryndal, anyway?

Tuesday, November 30, 2010

Continuing The Project

Here is an update on the "What To Do When You Don't Have The Energy To Do Anything" post from last week.  I've added a few things to my fabric wreath, but I'm simply not convinced that I'm done.

If you have any input please feel free to comment.

Monday, November 29, 2010

The Roses Are In Bloom

It's fall in Arizona.  It's our second Spring.  Twice a year we have lovely roses blooming all over our bushes.  Cliff, our neighbor, has even more.  I was never a "Rose" person until we moved into this house.  The 1950's cottage just seems to require them, and when they are in bloom you simply can't complain.

A Tiny Visitor
Remember to stop and smell the Roses today.  They are beautiful enough to make the Bee cease it's impossible flight, and the tiniest spider climb it's petals for a drink.

Sunday, November 28, 2010

Cute As A Button

I love my house.  It's old, it's tiny, it needs a lot of sprucing up, but I love my house.  Did I mention the fact that I love my house?
Our 1954 Ranch style home has a warm cottage feel.  At only 1300 square feet it's small.  When everyone still lived at home it was packed and felt packed.  The rooms are small and the bathrooms...don't even get me started.  I think my kids have the smallest bathroom on the planet. 

But I recently gave it a little pick me up and the charm has increased.

Yes, it was cheap.  I used recycled exterior faux shutters picked up at Stardust building supplies (there is a link below) for $4 a piece.  These originally black shutters were painted a horrendous olive green.  Two can's of extra coverage paint put them back to their original black color.  Ha!  Take that you ugly green people.

After a ridiculous attempt to drill a hole in the block wall with my regular drill, a trip to Home Depot was in order.  Let me just say this, the right tool makes the job so much easier.  With that big power driver I rented my son and I drilled out the remaining 23 holes in about 45 minutes.  Well worth the extra funds in my opinion.

The shutters were a piece of cake to hang.  I just tapped 6 plastic nail looking thingy's with little teeth in each shutter.  Perfect.  Next, I painted the window grids and surrounding sills in an antique white.  The shutter project took about 2 hours, including the trip to HD.  The painting touch up took the rest of the day.  It took an additional day to scrape all of the extra paint off of 41 window panes, but the ultimate result was achieved.  Charm, charm, charm, charm, charm.


Shutters...$16.  Paint...$22.  Tool rental...$40.  The charm that greets you went you come home...priceless. 

Oh, did I mention that I love my house....even more now?

P.S.  This is Arizona.  We do have tiny little pockets of quaint neighborhoods, and flood irrigation makes for some very affordable green grass.


Bryndal, your feet are all muddy!

Friday, November 26, 2010

Give Him Cookies And Milk And A Fat Man Will Let You Do Anything

I stuck a needle in Santa's butt.


 That's right ladies.  I stitched the old man's tush to a wreath and he didn't say a word.  Maybe he is just grateful that I saved his tiny little behind from a dirty yard sale box.  Maybe he had a sleigh accident and was paralyzed in the back side.  All I know is that he sat still and didn't squeel.

The shopping list for Mr. Clauses throne?   A white hangar from my closet.  Cotton fabric, lace and beads from the thrift store.  Ribbon from a craft grab bag at a yard sale.  And, of course, the man himself.  Kris was hiding in a box of Christmas leftovers at a yard sale last Saturday.  Shhhhh.  Don't tell him that he was actually a throw in on another deal.  I couldn't pass up that Korean war cluster bomb box...and...I asked them to throw in St. Nick.

The how-to for my man?  Cut lace into 5x5 squares and cotton fabric into 1 1/2x 9" strips.  I frayed the cotton to add a little softness to the piece.  Open an old hanger and run the hanger through each piece of lace about 4 times, folding the lace back and forth as you do.  Tie a piece of the cotton fabric on to the hanger between each piece of lace.  Pack that hangar full of lace and fabric, to the point where you can barely fit another piece in.  

Reconnect the hanger and fold the hook around into a loop with pliers.  If you're strong enough you can do it with your fingers but why risk breaking a nail.  
Wrap the wreath loosely in ribbon.  Sew the ribbon at various points to keep it from moving, if you wish.  Now for the fun part.  This is where I stuck Santa!  If you are going to make this wreath and have a LARGE center piece attach it first.  That way you won't cover up the cool little things you will attach later.
For the final touch I recommend sewing on beads, or trinkets, or pearls or whatever.  Make it your own.  Skip the hot glue gun.  I have found over the years that it doesn't stand up well in storage and you have to re-attach pieces every year.  Plus, I think that stitching things on this piece gives it a more Victorian feel.
Did I mention the milk and cookies??  Once Santa is stuck on the wreath....their aaalllllllllllll yours.
Merry Christmas and God bless.
Bryndal!  Share your toys.  Let the cat have the tennis ball for a while.


Poor, Lazy Woman's Thanksgiving Coleslaw

First of all, I was too lazy and too cheap to try it before Thanksgiving, so I am posting it after.  It was successful!  I received several positive comments on it, and when it comes to me and food preparation, positive comments are a rare thing...trust me.


Second, I took this photo next to the burn on my counter top and my 56 year old stove top to reiterate the "poor" aspect of this recipe.  No fancy kitchen here.  I don't like to cook or prep, so I don't need a fancy kitchen.

Third, I didn't buy the ingredients at the big box store that I won't name here ( but it starts with a "W") because I was too "lazy" to deal with the long lines.  So I went to the next cheapest store.  I estimate the cost of the ingredients at around $5.  Nuts aren't cheap.  Unless you live at my house, then they're a dime a dozen.

So here it is.  A bag of coleslaw mix, a bag of dried cranberries, a bag of walnuts, a jar of coleslaw dressing and some broccoli.  Decapitate two broccoli spears. Open all the bags, dump everything into a bowl that has a tight fitting lid.  Put a little bit of coleslaw dressing in the mix, snap the lid on and shake vigorously.  Repeat if you want more flavor from the dressing.

Quick and easy.  It actually took longer to find the lid for the stupid bowl than it did to make the salad.  We  had 18 people at dinner and there are left-overs so estimate the number of servings from that.  I won't list the calories or any important information like that, because we all know that we don't eat the serving size anyway.

Happy, simple cooking everyone, and God Bless.

Bryndal, do you want to try mommy's coleslaw.  Bryndal! Wait, come back!

Wednesday, November 24, 2010

What to do when you don't have the energy to do anything.

I've been under the weather in various forms for the last few days.  Today I got hit with the chills and a little bit of a fever.  Yeah!  Just in time for Thanksgiving.

The thing I hate most about being sick is that I can't stand laying around doing nothing.  But when you are too weak to get up out of your chair the best thing to do is something in the chair.  So I grabbed an old hanger and a piece of decorator fabric I bought at a thrift store.  I cut the fabric into 9" x 1.5 inch strips (approximately).  Hey, I'm gone today.  There is no way I am going to measure them.

I sat in my chair and tied the strips around the hanger then used some pliers to wrap the hanger hook around itself behind the fabric.  This is what I got.


When I am feeling better, I'll look at decorating it.


Bryndal, stop licking your brother!

Friday, November 19, 2010

More Ideas With Recycled Books

The brain never stops and the ideas keep coming.


I visited Mystic Paper with my sister-in-law yesterday and they have soooooooooo much stuff.  I'm sure I could spend a whole day there if I had it to spend.  But, we had to hop across the street to the antique store before she had to leave so my time was limited.

All that "stuff" gave me a whole new crop of ideas for these books I've been playing with.  How about picture frames?  I have hard plastic trading card sleeves that I found on ebay for my ATC art, and I thought "hey, I can use those to hold a photo inside a book." (Yes, I actually said that to myself).  The question was, how do I decorate the book and allow for it to be opened and closed again so the photo could be inserted.

Mystic Paper had the answer.  I was introduced to Hitch Fasteners from Idea-ology.  These are what you might finding holding your daughters diary closed.  I picked up a packet of 12 and promptly had to try them out.  4 book photo frames later, I have worked through the how-to's. 

I made two books that have ribbon hangers and two without.  Granted, these unique picture frames will stand up on a table or shelf unassisted, but I will be making a trip back to the paper store to look for a small hanger that can be attached to the back of the book so that the frame has more flexibility for display.

The trading card sleeve holds a card or picture up to 2.75 x 3.75 inches, so I am cutting the frame openings 2.5 x 3.5.  Speaking of cutting, forget this utility knife stuff.  Ouch!  I've been going to bed with cramped hands.  I stopped by Lowe's to pick up a new Dremel tool.

I burned my old Dremel tool out out years ago helping my son create his Starship Enterprise Derby car, which, I must say, one first place for design and managed to pull off a few race wins as well.  But, I digress.

Tonight I plan on playing with the Dremel to see how the cover and page cutting goes.  I expect a lot of trial and error so I'm sure there will be at least one book in the trash can.

Time to create a youtube video for these and write and e-book.  Just more "work" taking the time away from the creativity.  We must do what me must do.

PS.  I've been pulling apart my "mistakes" to salvage the hard cardboard covers and the pages.  You never know when something will come in handy.

"Bryndal, why are you chasing your tail?  You're going to make yourself dizzy."

Tuesday, November 9, 2010

Creative Books

Who says you can't teach an old dog new tricks?!  Everything old is new again.   Reduce, reuse, recycle.


Enough of the sayings, let's get to the "doings".  Books!   Books are a great adventure to be sure.  But when the adventure is complete, and the book is old, and the library gets cleaned out the books can end up in the dump or they can be refurbished into something fun and beautiful.

Art and decor doesn't have to be limited to the traditional.  Spread your "decor" wings and consider something different.  The creative term for it is "Altered Art".  It's not limited to books but this is one of the  major players.

My exploration started with a few books I picked up at the thrift store.  Combined with heavy scrapbook paper in coordination prints, some trims, ribbons, cut-outs and whatever, you can create a truly unique conversation piece.  After I finished "Chrysalis" my daughter stopped in her tracks and mid-sentence said, "wow, that's really nice".

To me, one of the best compliments I can receive on my art is one that doesn't have to be requested.


"Bryndal, get out from under the chair!"

Monday, November 1, 2010

Murder At Crooked House

I can't believe I haven't posted anything since January.  Holy Cow.

First and foremost let me follow up to my last post and show you the set.  I was really pleased with the way this one turned out.  Sheri and I think it's one of the best we have ever done.  Combine it with talented kids and a great performance and the whole experience was, again, truly enjoyable.  No wonder I love volunteering on it so much.


 The play was an audience participation murder mystery, and each evenings performance concluded with a different ending.

Back to the set itself.  The basic set with the walls and trim was constructed by "Willy" Williamson with Classic Home Improvements, in Chandler Arizona.  For the styling, the starting point was an inexpensive fabric which we used for the wallpaper of the set. I had original picked other colors from the fabric but ended up going with the sage green as the main color.  As part of the story line we had to age the set so after creating this beautiful set we stained the walls, the fabric, and the furniture and we distressed the doors and wood trim. 

The walls and the fountain in the garden were constructed of insulating styrofoam used in construction.  Carving and creating with this material can be a lot of fun.  If you can handle all the snow that is left lying around after you cut, trim and shape, you can spend many happy hours carving away while you let your imagination go to work. I also used fishing line to create a water effect coming out of the lions mouth.
 
Our faux library was created with very thing wood molding to create the look of shelving and book and trinket cut-outs were glued to a canvas wall framed on 1x2's. Each door swung open and gave the hint of part of the house, including a dining room and a solarium.

After 10 sets I'm still looking for a way to do something creative at home with this styrofoam.  There is always my husbands train set to work on.

Until next time, keep creating, keep smiling.  

God Bless.


Wednesday, January 20, 2010

Play Set - Day 1 Shopping for Materials

The Valley Christian High School play this spring is an audience participation murder mystery.  It will be set in the mid 19th century chronologically but the set is a turn of the century, aged manor.

Today I went to Stardust Building Supplies in Mesa, Arizona with VCHS custodian, Sean.  (yeah, yeah he happens to be my kid, but he is an official staff member)  Stardust sells all sorts of recycled building materials and other cool stuff.  Doors, appliances, cabinets, lighting, hardware, windows, fireplaces, paint, tile and more.  We even saw a nice set of truck rims there today.  You just never know.

They had a lot of blingy things there and my ADD was just going bonkers.  Sean had to get me to re-focus several times.  I'll have to go back when I can just spend some quality time digging through all the cool stuff

We found a set of french doors that are 5' wide and a single french door for the Solarium and Garden entrances to the set, as well as a brass sconce and a chandelier.  All together the items would have cost us $125.00  After speaking with Todd, the manager, they generously offered to lend us the said items, with the option for the school to buy them should Sheri decide to keep them.  Wow!  They were so willing to help us out I just had to give them a plug here. 


Thanks to Kenny and Gary who set everything aside for us so Sean can pick it up with his peek-up truck.

Thanks again Stardust.  We look forward to showing you how we have incorporated the supplies.


Sunday, January 17, 2010

NO MORE DIGGING THROUGH MY PURSE FOR MY iPHONE!

I finally got sick and tired of missing calls because I couldn't find my phone fast enough.  Before I purchased my iphone, I had a nice little case that hung on the outside of my purse.  Since getting the iphone I haven't found one that was large enough that had the same outside-of-the-purse hanging feature.

So I decided to make my own.  I guess I just can't get enough of that recycled fabric.


Another piece of an old tie, some jewelry rawhide and a few matching beads later I have my own, custom made iphone pouch that I can put on my purse or a belt loop.  No more digging!

Related Posts Plugin for WordPress, Blogger...